Five stations have been seen by viewers so far. The names of two of these, the Swan and the Pearl, are given by orientation films, while the names of two others, the Arrow and the Staff, can be surmised from the map featured in "Lockdown". A fifth station, the Flame, has been named but not seen. A "sixth" has been seen in the nature of a closed and guarded door at the Others' camp, but was later revealed to be a fake. Other stations have been seen in the map but are currently unnamed and unaccounted for. Three such stations are featured on the map (one of which is scribbled out), and there is also a circled question mark in the middle of the station locations, which is most commonly assumed to be the Pearl station.
The first station discovered by the characters is known as "Station 3, The Swan" in its orientation film, but is referred to informally by the characters as "the hatch."
According to the orientation film, Station 3 was originally constructed "as a laboratory where DHARMA researchers could work to understand the unique electromagnetic fluctuations emanating from that sector of the island."
Desmond is the sole occupant of Station 3 when the survivors of Flight 815 discover it. He claims to have been brought to the station by a man named Kelvin after his boat ran aground on the island three years earlier. Kelvin initiated Desmond into the code-entering procedure, which he referred to as "saving the world." After Kelvin's death, Desmond continued entering the code alone. Desmond explains that "Kelvin died waiting for his replacements," and initially mistakes Locke as being a member of the next team in "Man of Science, Man of Faith." When Jack first arrives in the station, and engages Desmond in a standoff for Kate and Locke, the computer controlling the timer is accidentally shot, damaging it. Desmond, wanting to be far away from the Swan when the timer hits zero, flees into the jungle.
After Desmond disappears at the end of "Orientation", the survivors, organized by John Locke, take on the responsibility for entering the code into the station's terminal.
Station 3 is almost entirely underground, except for a "hatch" entrance shaft and a concealed door. The word "quarantine" is spray-painted on the inside of the hatch, and the numbers (4, 8, 15, 16, 23, 42) are inscribed into its metallic exterior edge. It is illuminated by powerful lamps shining through windows as a substitute for sunlight, with a main work area resembling a geodesic dome. A strong but localized magnetic field emanates from behind a wall composed of rough concrete. The station also has several internal blast doors, as discovered by Michael. These blast doors close unexpectedly in "Lockdown" with Locke trapped underneath, at which time he sees a map written on the inside of the door in fluorescent ink.
Station 3 is stocked with food, a record player with a collection of old LPs, a small library, an armory complete with Kalashnikov (AK-47) rifles and other firearms, a late-model washer and dryer, a shower, and bunk beds.
Orientation film
The film found in the Swan Station provides a brief history of the DHARMA Initiative, as narrated by Dr. Marvin Candle. The DHARMA Initiative was founded by Gerald and Karen DeGroot, and funded by Alvar Hanso. The film gives a very brief description of the Swan station, and what occupants are expected to do.
An unspecified "incident" early in the station's experiments resulted in a change of focus: a two-member crew, replaced every 540 days, is now under orders to enter a code into a computer terminal every 108 minutes. The film stresses the importance of adhering to the procedure by entering the code quickly and accurately, but gives no reason or potential consequences. At the end of the film, a copyright date of 1980 is shown. An additional section of the film, returned by Mr. Eko when he found it in an hollow Bible in another station, adds about 30 seconds of footage in which Candle emphasizes that the terminal computer should not be used for anything other than entering the code.
Station 3 is equipped with a flip-card timer, which is controlled by a computer and connected to an alarm system. The computer resets the timer through manual entry of a numeric code "4 8 15 16 23 42" every 108 minutes and pressing an "Execute" button.
The code cannot be entered until four minutes before the countdown reaches zero, at which time the alarm begins to sound. Until that time, the computer is unresponsive to keyboard input. However, Michael has used the terminal several times to contact his son Walt. At the four-minute mark, a horn speaker alarm activates. After the one-minute mark, the alarm accelerates and grows louder, and then again at the 10-second mark. If the countdown actually reaches zero, the familiar black and white numbers begin to flip into a series of black and red tiles which appear to be Egyptian hieroglyphs.
Station 3 is still very enigmatic, and it is unclear whether or not resetting of the timer had a deadly effect on John and Eko.
The Swan Orientation video and Jack's comments
In Orientation, Marvin Candle describes the DHARMA Initiative's founders as "following in the footsteps of visionaries such as B.F. Skinner." In the same episode, Jack questions Desmond about the purpose of the station: "Do you ever think that maybe they put you down here to push a button every 100 minutes just to see if you would?" Jack suggests that the code procedure is a "mind game" and also questions the quarantine message.
Desmond's comments
Desmond recalls Kelvin equating the procedure with "saving the world" and takes the strong electromagnetic field as proof that the station has a non-experimental purpose: "I hope it's not real. But the film says this is an electromagnetic station. And I don't know about you, brother, but every time I walk past that concrete wall out there, my fillings hurt."
Henry Gale's comments
In Dave, "Henry Gale" (who has previously displayed very manipulative behavior) disdainfully addresses Locke about the Swan station, and states that "this place is a joke." After Henry accurately describes the post-countdown occurances to Locke, he says, "and you know what happened next? Nothing happened, John. Nothing happened at all. The timer just flipped back to 108. I never entered the numbers, I never pressed the button."
The Pearl Orientation video and Eko's comment
In the episode "?", the orientation video for the Pearl states that team members at that station are to observe and record "a psychological experiment in progress" through hidden cameras connected to monitors, one of which shows a view inside The Swan. Locke takes this to mean that the button-pushing procedure is part of the experiment, and is meaningless. Like Gale, he calls it a "joke." Eko, however, proclaims it to be "more important than ever" to continue, as they are being tested: "The reason to do it, push the button, is not because we are told to do so in the film... We do it because we believe we are meant to."
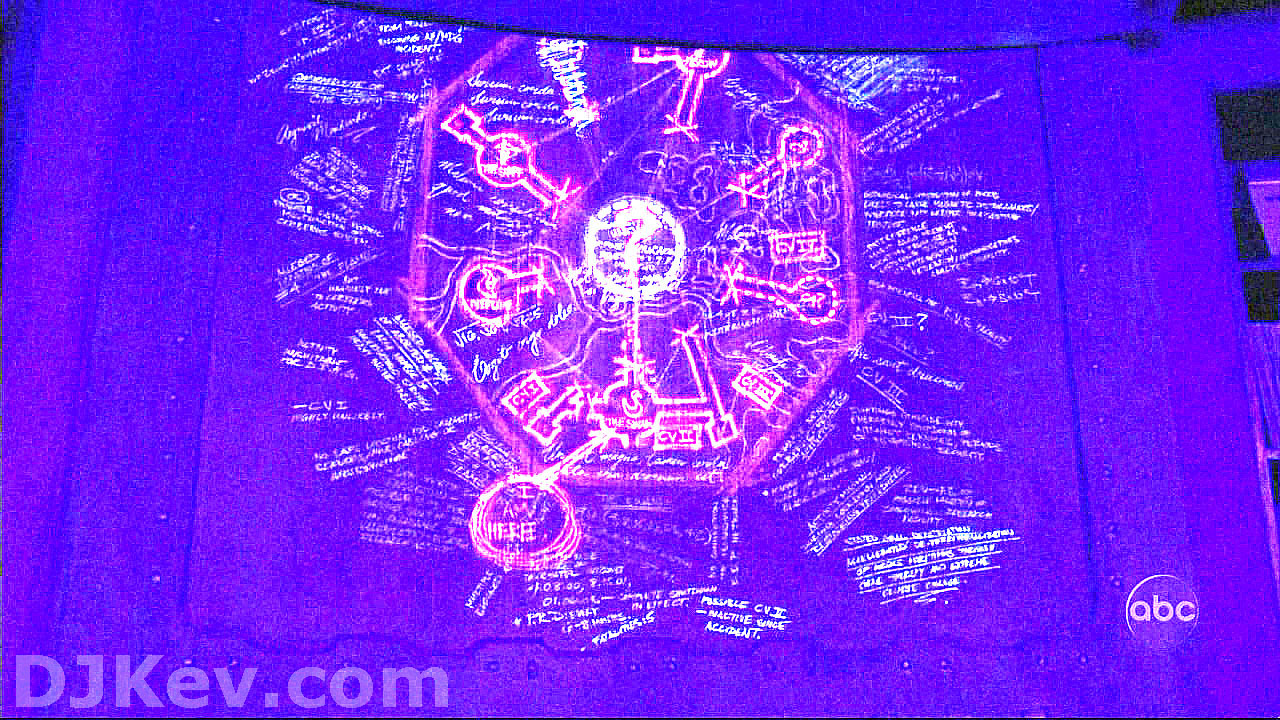
Map
The mysterious map featured in "Lockdown".
In "Lockdown", the blast doors drop. John Locke is pinned underneath one of the doors while the timer for the countdown approaches zero. Just after the alarm stops sounding, all of the lights go out and several ultraviolet lights turn on.
A drawing is revealed on the inside of one door, which appears to be a map of a part of the island enclosed in the shape of an octagon. At the bottom of the drawing are the words "I AM HERE" with an arrow pointing to a drawing of the Swan logo.
A high quality image of this map was received by Entertainment Weekly, which interpreted it as referring to additional DHARMA stations not yet seen on the show. [2]
On the map, there are appear to be six structures depicted, with at least four of them labeled by name and icon like DHARMA stations: the Swan, the Flame, the Staff and the Arrow. The other structures are labeled by numbers, some with question marks. Two of the alleged stations are drawn with dotted lines. The six structures all surround a big circled question mark in the center of the map. Visited in "?", this location was revealed to be Station 5, "The Pearl."
At the top left, there is another structure (a seventh) which is scribbled out. Among the stations on the southeast side of the map, there are four rectangular structures/labels that have "CV I", "CV II", "CV III", and "CV IV" written on them.[3]
The Truth About the Swan
In the Season Two finale, "Live Together, Die Alone", the real purpose of The Swan was revealed to be just what it was said to be. After "The Incident" mentioned in the orientation film, a protocol ("pushing the button") was created that stops the unique electromagnetic waves from building up and creating a massive magnet. Desmond believes that he is the reason why Flight 815 crashed, as he returned to The Swan on the day of the crash too late to enter the code safely. Since Locke had destroyed the computer in the present day, Desmond activated the self-destruct mechanism located under the computer room, which caused a brilliant white light and whirring electromagnetic sound to fill the sky. It is uncertain whether The Swan and its occupants at the time — Desmond, Locke and Mr. Eko — have survived.
Symbol: the circular portion is blank, resembling a pearl
The Pearl is a research station discovered by Locke and Mr. Eko in episode "?". Identified, enigmatically, by a question mark symbol in the ultraviolet map, Station 5 is a base for monitoring, through hidden security cameras, the Swan station, as well as possibly other DHARMA Initiative projects.
The part of the station visited is a viewing room, which features a three-by-three bank of television sets, two chairs and a computer, hooked to a printer. On the wall there is a pneumatic tube used to transport notebooks supposedly to another DHARMA location.
Locke and Eko find a hatch underneath the Beechcraft plane from Nigeria discovered in "Deus Ex Machina". They pull open the hatch, shaped like an octagon, and descend a long shaft. Locke flips a light switch, revealing a short corridor to a room with two comfortable chairs facing a wall with nine television screens. One television is already turned on, but showing static. Only one of the remaining sets is functional, showing what appears to be a video feed from inside The Swan. Locke sees a computer terminal and answers a prompt reading "Print Log? Y/N". A printer spools off several sheets of paper with the word "accepted" after strings of numbers. Eko finds an orientation video, but this time it is on a U-matic tape instead of a projector reel.
An orientation video discovered by Locke and Eko is similar to the one they previously viewed inside The Swan. The narrator appears to be the same man in both presentations. This time, however, he introduces himself as "Dr. Mark Wickman", looks younger, and has full use of both hands.
The narrator states that the purpose of the Pearl is to monitor and record the activities of participants in DHARMA Initiative projects. He explains that a psychological experiment is taking place in another station on the island: participants therein, unaware that they are under surveillance, have been conditioned to believe their work is of grave importance. Two-person teams in the Pearl station, working eight hour shifts over a three week period, are to watch the TV screens and take notes on their observations. Every action, regardless how subtle, is to be recorded into notebooks by the Pearl's team members, both for posterity and ongoing refinement of the Initiative. He demonstrates that a completed notebook should be inserted into a cylinder and fed into the pneumatic tube delivery system. The man affirms that the notebooks will be "transported directly to us."
He instructs the team members that at the end of their eight hour shift "you are to proceed to the Pala ferry, which will take you back to the barracks to prepare for your next - - -" At this point the video fades into snow, but resumes momentarily with the ending, containing the well-wishing of Dr. Wickman. The end of the video shows a 1980 copyright by the Hanso Foundation, as did The Swan's orientation.
Opposite the entrance to the room is a bank of nine monitors — three rows of three monitors — with each monitor's control panel set into the wall to the right of each monitor. Only one monitor appears to have a video feed being sent to it when Locke and Eko turn them on — real-time video from inside the Swan's main living area. However, in the Pearl Orientation video, the top left monitor is briefly shown to be working, depicting two men around the computer in the Swan. The middle monitor in the bank is connected to a U-matic player within the station. Immediately in front of the bank of monitors are two leather chairs on swivel mounts. Each chair appears to have a desk mounted to the right arm, a large magnifying glass mounted to the left arm (one chair is missing the magnifying glass), and a set of controls are built into the arms including a dial controlling the lighting level. One of the built-in desks has what appears to be a cigarette on it along with some small rocks or other debris.
To the right of the monitor bank is a desk with a computer, a printer, message containers, and to the right of the desk is a pneumatic tube. Built-in to the wall over the desk is a lamp to allow ample lighting over the desk. The computer is the same model - an Apple II - as the one inside the Swan's geodesic dome. (If you look closely, it even has the Swan logo on it.) The computer appears to be continuously logging something, which is later shown to be the dates of inputs of the code in the swan. The computer's prompt showed only one command asking if the user wanted to print a log or not. Eko took the print out from the computer with him when he left the station. The printer is an Apple ImageWriter II launched in 1985, which is an anachronism in relation to the orientation video's stated copyright year of 1980. However, this doesn't seem unusual, given that the Swan also has amenities that are obviously post-1980 as well.
The pneumatic tube is still in operating condition as Locke placed his drawing of the Swan's hidden map inside and it was whisked away. The Pearl's orientation film states that the pneumatic tube is to be used to send notebooks to "them" when they are filled with observations and notations about the psychological experiment. At least eleven message containers are present on the computer desk.
In the Season 2 finale, Jack, Sawyer, Kate, Michael and Hurley discover that the termination point of the pneumatic tube is a distant spot on the island, where piles of tubes containing journals are in a large mound.
Cupboard
To the left of the monitor bank is a cupboard containing stacks of notebooks branded with the logo of the Pearl and a video cassette of an orientation film for the Pearl. These notebooks were to be used by team members to write down observations of other team members within the Swan. Two double doors were on the cupboard, but fell off when Eko opened them.
The Truth About The Pearl
Despite what Eko and Locke originally thought about the station, The Pearl is the real psychological research station. Instead of the occupants of The Pearl, as they believed, studying experiments in other stations already in progress, they were the actual experiment, with their actions being closely watched. This is proven when Michael's party stumbles upon a massive pile of the pneumatic tubes lying untouched in a field, alongside the out end of the tube and Locke's map of the stations, which he sent through the tube in "?".
This station was found by the tail section survivors and used as a hiding place from the "Others". The station was found to be gutted and seemed almost entirely empty except for a box containing a Bible, a short wave radio and a glass eye. It was later revealed by Eko, in "What Kate Did", that the Bible contained film missing from the Swan's orientation video, which warns the occupant not to use the computer for communication with the outside world.
The Arrow is located in the jungle on the other side of the island from the Swan. It's about four days' walk from where the tail-section crashed into the ocean and about a day's walk from another beach near the Arrow. The station appears to be built into the side of a mountain or cliff, rather than underground like the Swan, the Staff or the Pearl. The only known entrance to the Arrow is a door that is shrouded in hanging vegetation and thick undergrowth (in contrast to the other discovered stations, the Arrow was poorly concealed in comparison). On the inside of the door the text "quarantine" is stenciled in similar fashion to that of the Swan's hatch. Unlike the Swan, the Arrow's entrance does not contain a stairwell to go further down or an airlock. The passageway leads from the entrance directly into the interior of the station.
The interior of The Arrow seems to consist of only a few rooms. The station appears to have been long abandoned with a filthy interior and only a few objects inside. Electricity still runs in The Arrow, but only powers a couple of lamps and bare light bulbs. Electrical conduits and exposed wires run along the interior walls. The rooms are barren, with concrete floors and walls. At least one of the rooms however, appears to have been painted off-white with a teal border running along the bottom of the walls, but the paint has peeled and chipped. The large room contains several crates or containers and a shelf.
Crate
One of the crates inside The Arrow contained a Bible, a glass eye, and a two-way radio. The Bible was hollowed out to hide a reel of film containing missing footage from the Swan’s orientation video. This footage was given to Locke by Eko in "What Kate Did" and contained a warning about not using the Swan's computer terminal for anything other than input of the code.
When Claire's baby, Aaron, becomes ill, she begins having flashbacks of the time she was abducted by Ethan Rom. Convinced that her baby needs to find some of the vaccine that was injected into her pregnant stomach during her abduction, Claire leads Kate and Danielle through the jungle to the station where she had been held. While travelling, Claire's flashbacks continue sporadically, revealing that this is where the "Others" were going to have Claire give birth, and that there was a nursery provided for the baby. Claire also remembers that there was a corridor that she tried to go down, but that she was diverted by Ethan. When the trio find the station, however, it has been abandoned. In a locker room, Kate finds costumes and theatrical makeup, including a fake beard, which is very similar in appearance to that worn by Mr. Friendly. The Staff seems to be a former medical station, since it comes complete with an operating room and is adorned with the caduceus symbol, often (incorrectly) associated with the medical profession. Claire and Kate lift the refrigerated cabinet to find that all the medicines have been removed. However, Aaron recovers as Jack predicted before Claire and the others left on their quest.
The Staff is located by a large clearing in the jungle and is entirely underground. There are at least two entrances/exits: a main entrance and an escape hatch. The main entrance, consisting of two large doors, is built into the ground and connects to a stairwell leading deeper underground. Inside the station, a door set into one of the hallways has “ESCAPE HATCH” written above it. It is unknown where this escape hatch leads to.
The main entrance stairwell terminates at a circular doorway within the Staff. A box is mounted on the wall near the doorway and contains several DHARMA-branded flashlights. Connected to this doorway are two hallways on either side, giving the station the shape of a “V”. From the circular doorway, the hallway to the right terminates at an operating room. The door to the escape hatch and three other doors are located along the walls of this hallway. The hallway to the left of the circular doorway was not shown. However, Kate ventured down this hallway and was able to restore power to the station somewhere in that hallway. A locker room and a nursery are attached to this hallway.
The previous occupants of the Staff were Ethan Rom and Mister Friendly, among others. Just before her escape, Claire saw six individuals dressed in white surgical scrubs inside the operating room. A young girl helped Claire get out of the Staff.
At the end of the right hallway is the operating room. The room has built-in cabinets with a shelf and overhead cabinets along one wall, a large array of surgical lights mounted to the ceiling, and the walls of the room are painted with a subdued color palette. When discovered by Kate, Claire, and Rousseau, the room contais a metal basin, a lockable refrigerator ,and a couple cardboard boxes.
Claire’s flashbacks of her stay in the Staff show a more fully-stocked operating room. It supposedly contained an examination table, an Acoustic Imaging 5200 Ultrasound machine, a floor lamp, and medical supplies.
A nursery is located in the Staff and doorways leading into both hallways of the station. The walls of the nursery are painted baby blue. When Claire and Rousseau found the nursery, it was barren with only a wooden rocking chair and several boxes strewn about. Imprints of hanging decorations were on the walls, but the objects were not in the room.
Claire’s flashbacks of her stay in the Staff show a fully-furnished nursery. It contained a bed, a storage chest, drawers, shelves with books, and several lamps. Children’s paintings and ornaments adorned the walls of the room. Numerous toys and stuffed animals were placed about the nursery. In addition, the nursery contained a crib with a mobile featuring four Oceanic airliners. Due to being drugged during her stay at the Staff, the actual furnishings of the nursery shown in Claire’s flashbacks may be exaggerations or entirely fabricated in her mind.
Locker room
The locker room is located in the left hallway of the Staff. The room contains at least two rows of double tier lockers and one row of single tier lockers with the Staff logo emblazoned on the locker doors. Inside one of the single tier lockers, Kate discovered ragged clothes and a ragged wool cap. At the bottom of the locker was a wooden case containing a fake beard and DHARMA-branded theatrical glue among other items.
The Flame has not yet been found. The symbol in the middle of the station's DHARMA logo is an upright rectangle, resembling a door. The map drawn on a blast door in the Swan gives its alleged location between the Staff and the Swan.
A station door appears at the Others' camp. The entrance is guarded by two "Others" with M14 rifles. Michael claims that this hatch is where the Others keep the people they captured. In the finale of season 2, it is revealed that there is nothing behind the station's door. When Sayid sneaks into the others' camp, he finds that the door to this hatch leads only to a small cave in the rock about the size of a walk-in closet.

